Thursday, October 31, 2013

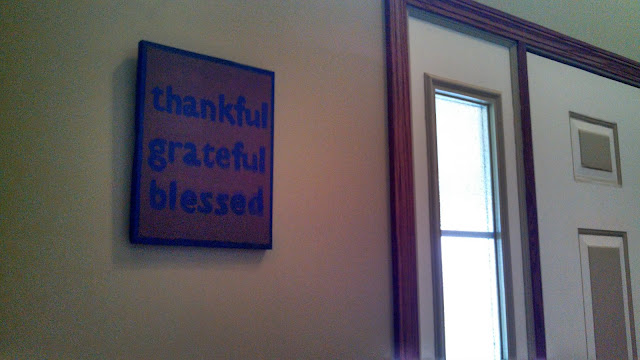
Thankful. Grateful. Blessed.

There's no real tutorial for this sign. It was pretty straightforward:
  1. Cut a board to your desired dimensions.
  2. Paint or stain said board.
  3. Project up your letters or freehand them.
  4. Paint letters.
  5. Hang.


As far as the hanging goes, I have a confession. I've mentioned before I tend to get impatient when it comes to finishing projects. Since I didn't have any hangers, I improvised. 


That's two staples from a staple gun and a piece of wire ran between. I definitely wouldn't recommend this for anything heavy, but for this, it worked! Who would've thunk?

Wednesday, October 30, 2013

How a menu board makes my life easier

One of the great things about being married to a farmer is we always have tons of raised-by-us meat in the freezer. One of the bad things about that is the freezer!

I enjoy cooking, but I have this bad habit of leaving the meat in the freezer until it's time to prepare a meal. Then, I have to spend lots of time defrosting it. Or, I inevitably run into that, "What the heck am I going to cook" dilemma. 

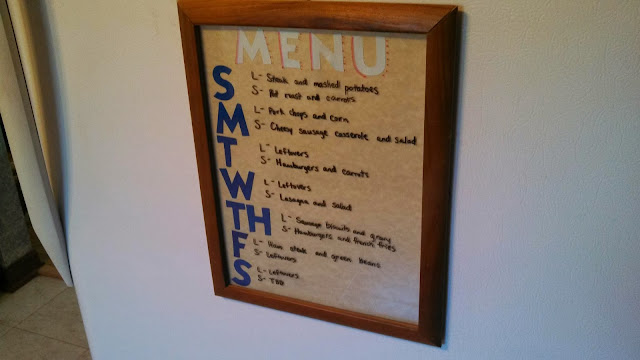
So, a while back, I devised a simple menu board to help me with that planning. I took a picture frame that was laying around collecting dust with no picture, a piece of scrapbook paper, and some sticker letters. I whipped them together and bought a pack of wet-erase markers. Here's the result:


I saw much more complex versions on Pinterest, but this simple idea works for us. At the beginning of the week, I make a menu, and I do my best to stick to it. Of course, there are always last minute plans that change things. (Ie: Greg says he'll be home in 10 minutes to eat, and the meal for that day requires 30. Or, Greg's in the field or at the farm, and I need something easy to take to him.) For the most part, however, the menu board makes life simpler.

It really accomplishes a few things. First, it reminds me to get things out of the freezer. If I need corn or beef the next day, I get it out to defrost the night before. Secondly, it helps me make avoid questions like, "Haven't we already had ham three times this week?" Finally, as I plan, it helps me incorporate new recipes into our meals.

Do you guys do any sort of menu planning? What's it look like at your house?

Monday, October 28, 2013

A bio for the blog

I've been doing some updates and organization on the blog today, so I thought it would be a good time to write up a bio.

It's challenging writing a biography when you don't know who will be reading it, so I'll just tell you the basics.

I've been married nearly five years to this great guy:


We met through a fantastic youth organization called FFA. I could write for days about FFA. But, long story short: I would not be the person I am today without the opportunities I had. FFA literally changed the course of my life. And, I made some of very best friends to this day.


Greg and I didn't start dating until we were students at Ohio State.


I had some fantastic opportunities at OSU. I traveled all of the world, including South America, Europe, and Africa. One day, I aspire to visit all seven continents.


I graduated in 3 1/2 years and became a high school agriculture teacher. Greg and I got married, and I moved to a new part of Ohio. It took me a while to get used to the flat ground, but I've come to appreciate scenes like these:


Greg works full-time and then some on his family's dairy farm. I didn't grow up on a farm, but I've definitely gotten a crash-course being married to a man who lives, works, and breathes farming. I've learned to drive tractors, haul manure, pull trailers, make cow feed, and the list goes on.


This spring, Greg and I started a new adventure called parenthood. We welcomed Dwight Owen (named after Greg's grandpa) and Jordan Scott (Scott is Greg's middle name) into the world. They are absolutely wonderful babies, and we couldn't be happier with our family of four.


This year, I've stepped away from the classroom to spend time with these bundles of joy. I keep myself busy though, helping farmers make good decisions about corn and soybean seed, serving our little township as fiscal officer, designing websites and graphic design pieces, running a corn maze and pumpkin patch during the fall, and of course, keeping up with Greg, Dwight, and Jordan! In my spare time, I love to cook and craft.

That's me in a nutshell. I hope you enjoy reading about our life adventures!

Sunday, October 27, 2013

In love!

First off, credit is due to www.sawdustandembryos for the barn board tutorial (which I talk about here), and to www.threemangoseeds.blogspot.com for the inspiration for this sign. This is the picture I saw on Pinterest

I liked it, but I wasn't completely in love with it. Plus, I'm in the process of repainting our shutters and doors red to match the barn we just built, so I knew I wanted to incorporate red. Finally, the original idea used pallets. And, well, see my last post

So, I headed to Lowes, with the boys in tow. That's a challenge to tell you about another day. I purchased 6 1x4x6 (they are cheaper in longer lengths, but I had my SUV, so I opted for 6 ft boards instead of 8.) They were $1.68 a board or something like that. I also bought the red paint, which I'm going to use on our shutters. 

The first step was to cut the boards to length using a miter saw. Then, I splashed on some cream colored paint and white paint left over from other projects. After the paint dryed, I stained over very lightly (using Minwax Provincial.) The result were boards that looked aged. Read the linked post in the above for more details on this process. 


Next, I ripped a 1x4 in half on the table saw. I didn't take pictures of this step, but really, I just put the board through the table saw, nothing like rocket science or anything. Then, I cut the ripped pieces on 45 degree angles on the miter saw to make a frame. I should've painted the boards before attaching them to my sign, but I was too excited. (Sidenote, I tend to get really impatient when it comes to things like letting the paint dry!) So, I proceeded to attached the frames to the sign boards. The process looked something like this:


I laid the boards in the order I wanted them on a table, laying off the edge some. Then, I clamped the frame pieces one at a time, and ran in screws from the back of the sign to the front. This could also be done with nail brads. The only thing that holds all of the sign boards together is the attached frame pieces. Once the frame was attached, I taped it off to paint.


I painted the frame red, and pulled out my handy-dandy overhead projector. I projected up the words and traced with a pencil. (The font for "Welcome" is Great Vibes. "Friends & Family" is Minion Pro- my favorite font!) I painted very carefully inside the lines. Again, this is where I started speed working, so not too many pictures. After the words were done, I decided I wanted some squiggles, so I projected those up too. 

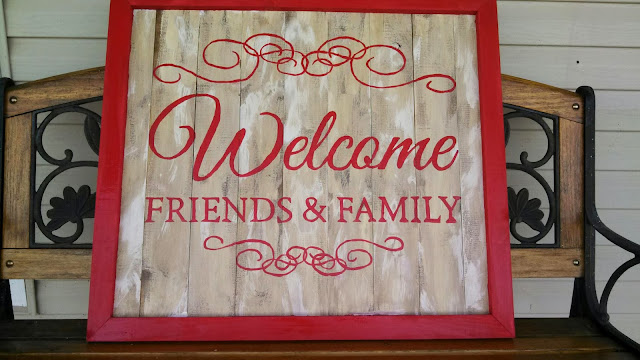
And, here's the finished project! As soon as our shutters are painted, this beauty will hang beside our front door. What do you think?


Wednesday, October 23, 2013

My first pallet sign

Pallet signs are everyone on Pinterest, Facebook, Etsy. You get the picture. This inspiration for this project can be credited to a tutorial on Sawdust and Embryos.

Here's the finished product.


And here's how I did it:

Step 1: Prepare wood.

For this sign, I used pallet wood. Afterall, everyone else does it. And, just because everyone else jumps off a bridge, doesn't mean you should. You can buy a 8ft 1x4 at Lowes for around $2. Do it! Like, jump in your car, and go right now. Just because a pallet is free, doesn't mean you should use it. This step took FOREVER! The top left is the sawzaw I used to cut the boards off of the pallet. Then, I ran them through the table saw to get smooth edges. There's some other steps, but I did this project a couple of months ago, and I've lost my mind since then, so I'm not sure what the other pictures are in the collage.

Step 2: Paint wood and make your template.


Excuse the poor lighting. I did this project in my basement, and I was too excited to snap better pictures. Making barn boards is so easy it should be illegal. Seriously, just slap some paint on (top picture), let it dry, rough it up with sandpaper, and stain over it (bottom picture.) Voila!

While the paint was drying, I used my handy overhead projector ($10 on Craigslist!) to make a giant bracket-shaped stencil on cardboard. I taped the cardboard to the wall, traced, and then cut out the shape.


Step 3: Cut out your wood.


I laid the cardboard on the boards and traced around it with chalk. Be careful when you do this step that the stencil fits on the boards well enough that you can easily cut it with a jigsaw. I went to town with jigsaw and was ready for the next step after a good sanding. 

Step 4: Prepare a back.


I cut a piece of 1/2 inch plywood to attach to the back of the boards to hold them all together. The boards are just fastened to the plywood, not to each other. If I was going to do this again, I would ran slats horizontally instead of having a full piece of plywood. I didn't take a picture of this, but I left to of the screws drawed out a little, so I could run wire between them to hang the sign. After I stretch the wire across, I tightened the screws back up. I stained the plywood then.

Step 5: Stencil your letters and paint. 

I hung the sign on the wall, put my transparency back up, and traced the letters using chalk. I didn't realize my sign was a little crooked, so the final product ended up just a little slanted. I used regular latex paint, leftover from painting our house, to fill in the letters. I also painted the edges.

All in all, this project probably took close to five hours, but it would be much quicker if you used 1x4 instead of pallet boards. The options for signs like these are limitless. Enjoy!

Wednesday, October 16, 2013

Remember that time?

Remember that time I started the 21 Day Blogging Challenge? Well, it turns out I hit a roadblock, so I just stopped blogging. I reached the prompt: "The hardest thing you've ever experienced." I pondered and pondered, and I just couldn't come up with anything. Lame, I know. Truth be told, I honestly couldn't come up with anything.

So then, I started wondering. Had I really never experienced anything hard, or was I just looking for something "blog-worthy?" Surprising, I know, but it was the second. I was so focused on impressing my readers (all 3 of them, probably), that I thought it'd be easier to just not write anything. So, I stopped writing. I waited for inspiration, and it didn't come.

Today, I came across a new blog: The 22nd Year. I've met the writer (after all, FFA-land is a small world), but I don't know her personally. However, her blog really made me think. She often writes about wanting to "find something more." I realized I'm on the same journey, searching for something more. It's a journey that no "blogging challenge" can help me appreciate.

I'm throwing in the towel on the Blogging Challenge. (Truth be told, I threw it in back in July, the last time I blogged.) Instead, I'm going to start blogging about meaningful things. I'm going to write about creating a legacy (through my beautiful boys), inspiring others (as those opportunities hopefully arise) and finding inspiration myself, my goals and dreams for the future, and things that have meaning to me. (I will still throw in a craft or two here or there, because those help me take time to slow down, and I enjoy seeing the projects evolve to completion.)

So, here goes, a new feel for my blog, but hopefully it will help me appreciate this journey I'm on.